Automate Data Quality Warnings with Webhooks
Introduction
Data quality warnings are a great addition to any Tableau Server and Online deployment. This messages feature is part of the Data Catalogue, which makes up the Data Management add-on. If you enable this feature you can, for example, inform your users that a data source has problems. You can set these messages on various data assets so that everyone is aware of any potential issues would they be using any of these assets. Together with another great Tableau feature, webhooks, you can now fully automate the process of informing your users of these issues. In this blog post I will describe how to configure this integration. We are going to use AWS Lambda functions to receive the webhook calls, and the Tableau REST API to update the data quality warnings when a data source refresh fails. However, this is just one example of how you can leverage webhooks to automate Tableau Server management tasks.
What are data quality warnings?
As mentioned previously, Data Quality Warnings are custom messages you can set on assets on your Tableau Server or Tableau Online. Currently when you use data quality warnings you have to manually add them to each asset. While this is easy to manage when you have very dedicated data stewards, ideally you want to automate this process. Let's first take a look at who can create data quality warnings, followed by how to set them up manually. After that I'm going to describe my approach to implementing this automation piece with webhooks.
Who can create data quality warnings?
You need to have the Data Management add-on enabled on your Tableau Server or Tableau Online instance. The Data Catalogue, the tool that creates the lineage on your environment consumes these warnings. If you are not convinced by this blog post why you should use Data Management tools then take a look at the official Tableau website. Data Management is a huge piece in Tableau's motto in making your company a data-driven organisation. This is therefore a cornerstone in Tableau's Blueprint. Read more about blueprint here.
Back to quality warnings, in order for users on the server to manually set a data quality warning, you must:
- be a server or site administrator, or
- have the save capability for the asset
When you create a data quality warning this warning is visible to all users of this asset and any of the downstream assets. For example, if you set a warning on a datasource it propagates down to dashboards that have an upstream dependency on this datasource. There is also an option to set a 'high visibility' for your warnings. This is for those times where you want to inform your dashboard users that there is a problem with the underlying data in the dashboard that they are viewing. Users will be notified through a banner on the top of the dashboard when they load the page. This clearly indicates that something is going on with the data. You can see this high visibility feature in action in this video from my colleague Tim Ngwena.

How do I set this up manually?
At the time of writing there are four types of data quality warnings:
- Warning
- Deprecated
- Stale Data
- Under maintenance
To manually create a a data quality warning you have to follow these steps (from here):
- Select the More actions menu (. . .) next to the data asset you want to create a warning for, and select Quality Warning.
- Select the Enable warning check box.
- Select one of the Warning types (as listed above) from the drop-down list.
- (Optional) Select the Enable high visibility check box.
- (Optional) Enter a message to display to users.
- Click Save.
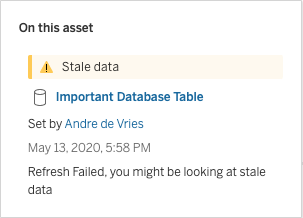
Besides showing one of these types you can also add a message with more details about the warning (Step 5). For example, if an extract fails to execute then you can set a 'Stale Data' warning, but then add a custom message informing the users why this is the case and when a fix will be in place.
How to automate this process?
Now let's talk about the way to automate this whole process of setting quality warnings. In the use case that I prepared I assumed that when an extract refresh fails, we need to inform the users through adding a data quality warning. The next time when the extract runs, and this is successful, it needs to remove the data quality warning. In addition, this whole process should be automated. The tools that we need for this are the following:
- Tableau webhooks: to send notifications when a data source has failed and when it has successfully refreshed
- AWS Lambda: a place that can receive the webhook notifications and further process them
- Tableau REST API: to automatically set and/or remove the quality warnings
Number two in this list can be any place that can receive the payload from a webhook and subsequently call a Tableau REST API endpoint. In the past I have used no-code solutions for that - like Zapier or IFTTT. If you want to learn more about the various use-cases of webhooks then I would recommend watching this webinar I hosted with my colleague Laine a few months ago.
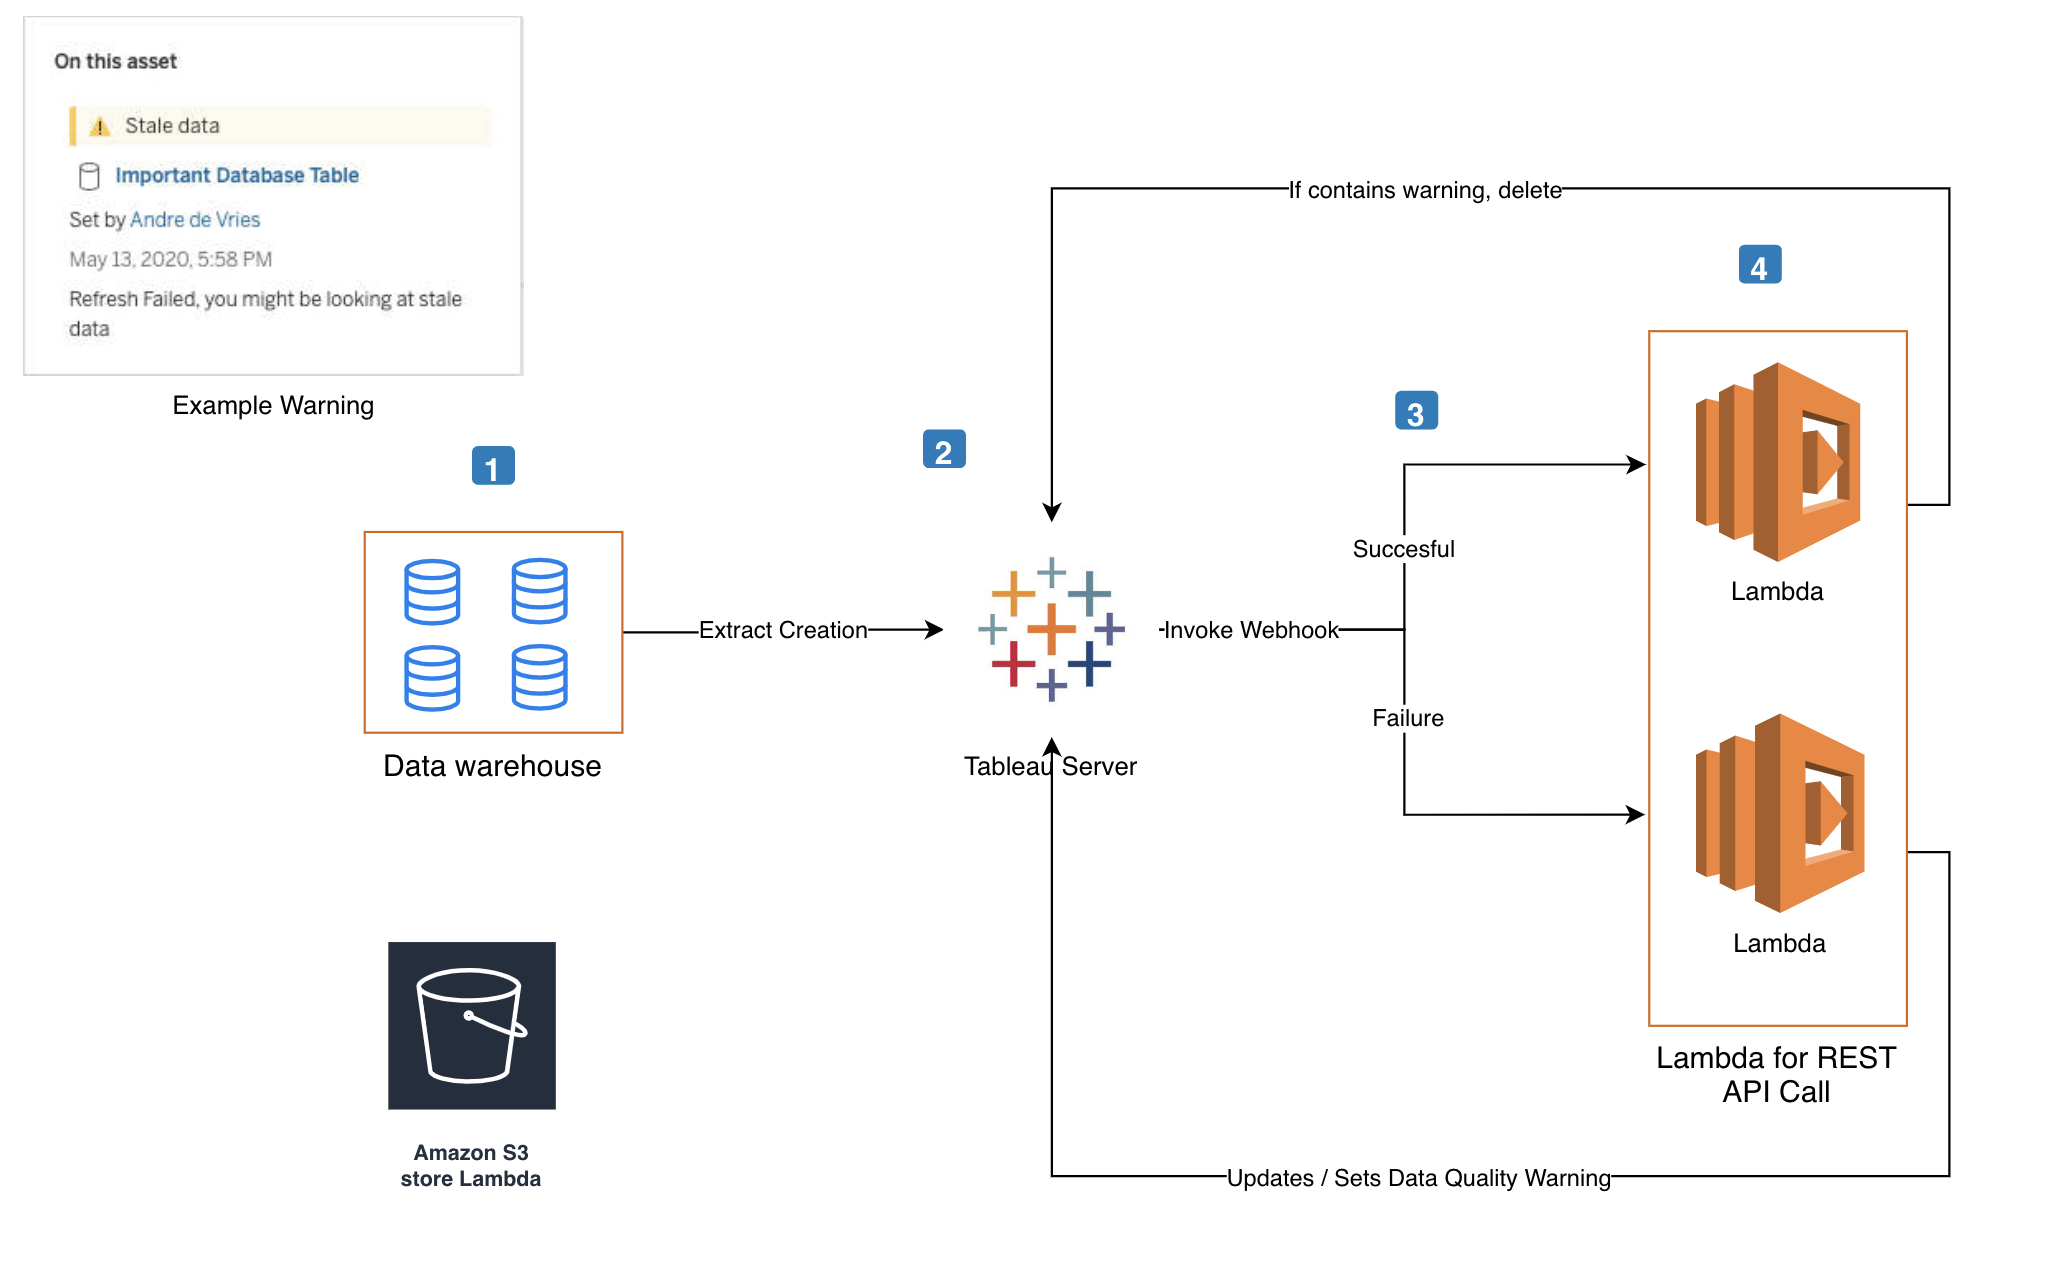
This is a diagram that describes the flow of automating these data quality warnings.
1. Configure the webhooks
I use Postman to configure webhooks. It's the easiest and quickest way to get up and running if you want to make API calls. If you haven't downloaded the Postman collection for Tableau webhooks then head over to this Github repository. You can learn how to configure this collection in this blog post.
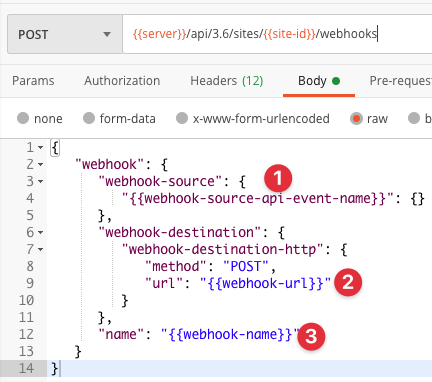
When you create a webhook you need to configure for what type of event you want to listen for. These events take place on a site level. For my use case I want to start my data quality warning workflow when a data source refresh fails. For that I need to create a webhook with the 'webhook-source-event-datasource-refresh-failed' API event name. We also need to listen for successful data source refreshes and for that we can use the 'webhook-source-event-datasource-refresh-succeeded' event.
We need to configure a few things before we can create a webhook on the Tableau Server. Step 1 in the image below is the API event name. In order to create these webhooks we need a destination endpoint, which is step 2. This is where we want to use a serverless function. AWS Lambda gives us that option. The final piece that you need to fill in is the webhook name (step 3). That can literally be anything but I would give it a name so you can easily identify it again in the future.
2. Create a Lambda Function
As mentioned above, you don't necessarily need to use AWS Lambda for this. Any place that can receive HTTP requests and further process them will suffice. I am using AWS Lambda because that is what I am familiar with. Nowadays any Cloud Provider has these serverless functions in their offering so you are not limited to using AWS.
The reason why I am using a serverless function is that these are very cost-effective, fairly easy to setup and you don't have to provision any servers. The only thing you have to provide is the code. Especially for our use case this is a super interesting offering because of the infrequent nature of the extract refreshes. You don't want to have a server running 24/7 that only needs computing power a few times a day to process a webhook. In the code of our function we will be calling the Tableau REST API to either create a data quality warning or remove the data quality warning.
There are a few ways to create a Lambda function on AWS. You can create them manually in the AWS console and write your code there or you can use the AWS Serverless Application Model. However, I'm a big fan of the Serverless Application Framework. This makes it super easy to create and deploy these functions. You can also execute and test them locally on your machine before you push them up to the cloud (and incur costs).
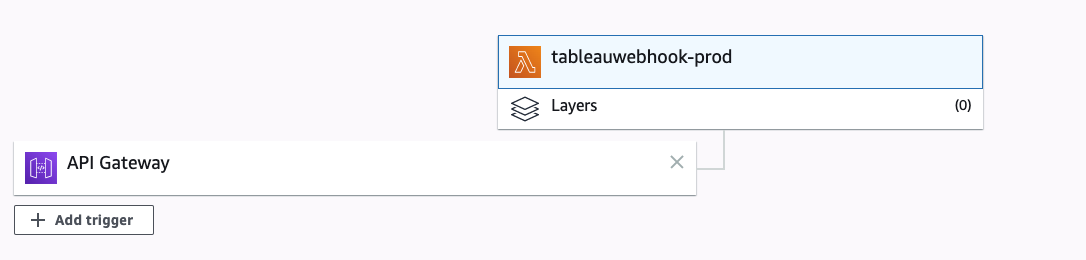
I really depends on what service you are using to create these functions. Hence I don't want to give you a step by step instruction on how to do that. This blog post on the serverless website shows you a really quick way to provision a Lambda function on AWS. The most important element at this point is that you configure API Gateway with your function. This will be the trigger for the Lambda and the place where the Tableau webhook will send the payload to. Once you have enabled API Gateway you should receive a URL. This is the URL that you have to use when you create the webhooks. This is the URL you need to provide in Step 2 of the image in the previous sub heading.
You need two webhooks for this use case. One that listens for a successful refresh and one that listens for a failure. You can, however, send the payload of these webhooks to the same Lambda function - in the diagram above I drew two Lambdas but that was purely for making it clear that there can be two streams to the same Lambda. You can then in the code itself identify if the payload is for a success or a failure. More about that in the next paragraph.
3. Make Tableau REST API calls
The Tableau REST API allows you to programatically access content on your Tableau Server or Tableau Online. You have lots of possibilities with the API, this ranges from programatically provision users to uploading content. With the Data Management add-on we have a few more API endpoints we can access. You can find them here. The ones we are interested in are:
- Add Data Quality Warning
- Query Data Quality Warning by ID
- Update Data Quality Warning
- Delete Data Quality Warning by ID
The first thing you need to do before you can use any of these API methods is to create a Personal Access Token. Read more about that in this blog post. After that you need to make a login request to generate an authentication key. This is needed to make further API calls.
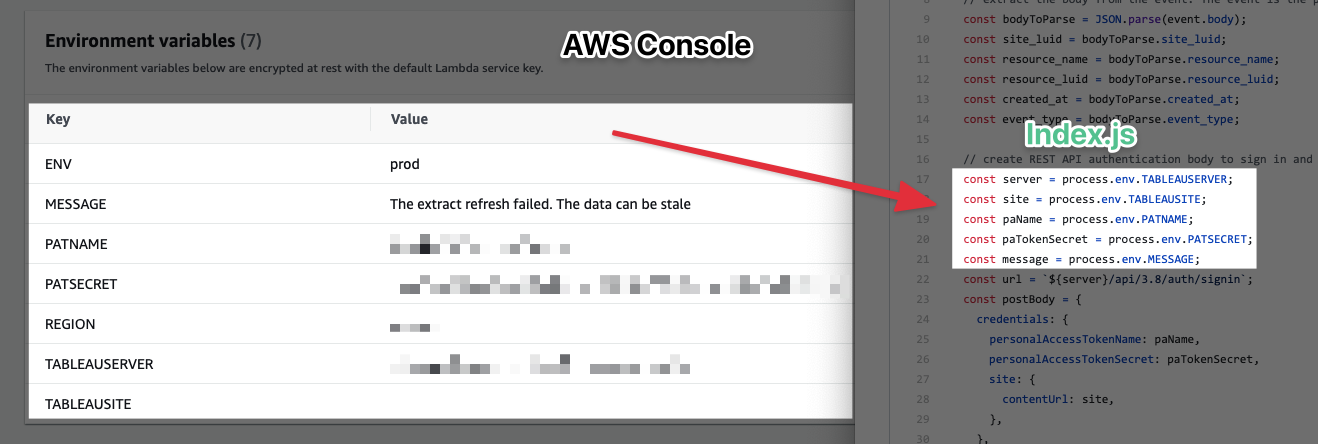
All of these API calls will be made from the Lambda function. You can find the finalised code in this Github repository. As you can see in the index file I use environment variables. You can configure these keys in the AWS Console when you create the function. This makes it easier to update them because you don't have to change them inline in the code. It's also a lot more secure to have them in the console.
I'm using the NodeJS runtime for the Lambda function. You can also do this in any of the runtimes that are supported by Lambda (Python, Go, .NET, Ruby etc). I don't really want to go into each line of code (I've used inline annotation). Let me highlight the most important parts:
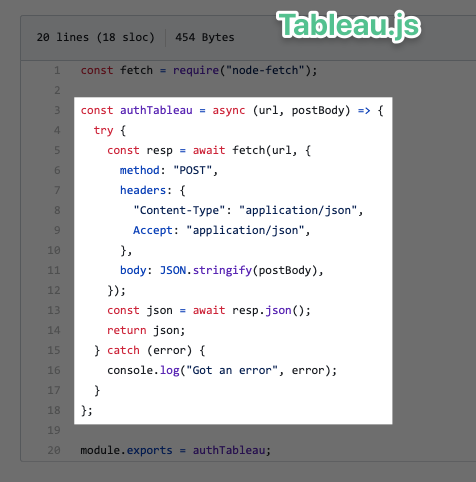
Login to the server. Each time the Lambda function executes (so each time it receives a webhook payload) it logs into the Tableau Server and requests an authentication header:N
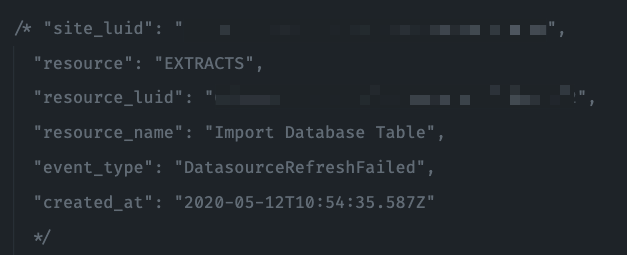
Example payload that comes from the webhook: this can be used to derive if the refresh was successful or failed.
Because we configured both webhooks (success and failure) to send their payload to the same Lambda we need to check which event was fired off. Depending on the event we want to do different things.
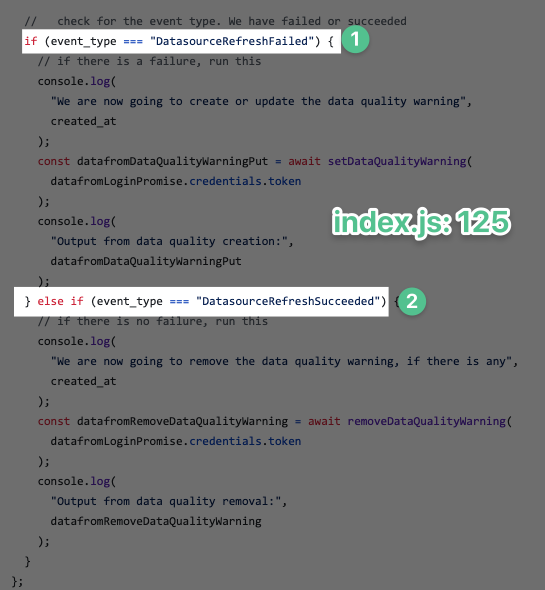
The code block underneath the 'DataSourceRefreshFailed' uses the authentication token to set a data quality warning (Step 1). The custom message for this warning can be configured in the environment variable of the Lambda. The next time this Lambda function kicks off, and the same asset is involved, but now it refreshes successful the second code block is executed (step 2). This is the part that removes the warning if there is a warning present.
In Conclusion
I understand that the majority of Tableau users want to completely configure this in a code-free environment. However, this includes a bit of code that receives the webhook payloads and makes the REST API calls. But as I mentioned previously, serverless functions make this type of development a lot easier. You don't to configure any servers or maintain these instances. This is all handled by the cloud provider that you are using. This is also not a blog post with exact step-by-step instructions on how to configure it but with the Github repository and the various blog posts that I referenced throughout you should be able to set this up. If you have any questions you can hit me up Twitter!