- Published on
- • Tableau • 0 views
Build your first Tableau Dashboard Extension
In this blogpost I will walk you through building your first Tableau dashboard extension. It is aimed at those that have no prior experience with creating extensions. I'll explain my setup for building them and then we will build a basic extension that allows you to auto refresh your dashboard on a timer. This could be useful for when you are publicly displaying a dashboard and it needs a regular data refresh. This process would then be automated.

Intro
With Tableau Dashboard Extensions you are building web applications that have two-way communication with your dashboard. These extensions are dashboard objects, similar to containers and images. You have to be on version 2018.2 of Tableau in order to use extensions.
As mentioned in the introduction we are going to build a simple extension, purely to demonstrate all the elements that you have to take care of when creating them. We're not reinventing the wheel with the functionality of this extension, others such as, Tamas Foldi have done this in the past. My aim with this blog is to introduce you to my setup, making sure you understand the building blocks of an extension and to give you a kick start to developing your own extensions.
Web Applications
Extensions are web applications. This means you need at least a basic understanding of the building blocks of the web: HTML, CSS and JavaScript. In this blog post we will only write 'front-end' code - also called 'client-side'. If you want to implement an extension that does things like write back to a database then you will need to write a 'back-end'. The backend is all about communicating with servers and databases.
Besides HTML, CSS and JavaScript I would also recommend learning about how you can deploy your extension and make it available for others to use. Deploying basically means that you publish your extension to the web.
My setup
I've been using a Mac for the past 10 years and therefore this setup bit is focused on those that have a Mac. I'm certain Windows has equivalent tools. Actually building extension is platform agnostic of course.
When I started looking at building extensions I first went to the official Tableau Github Page and read the documentation. This should also be your first port of call. Under documentation you see that Tableau recommends you to install Git and NodeJS (and NPM). Git is useful if you want to do version control and if you work in a team on the same project. It's not a prerequisite for building extensions though. I would highly recommend installing NodeJS - you get NPM, which stands for Node Package Manager, automatically with the install of NodeJS. You use the latter to write JavaScript outside of the browser/client side. Tableau uses it to run a server on which your extensions are 'served'.
In addition you will need to download Chromium - which is a browser built by the Google Chrome team. Chromium is used for easily (remote) debugging of your extension and it is the browser that's in the actual extension window in your dashboard. Tableau recommends that you install version 47.0.2526.0 of Chromium.
You also need a place where you write your code. You can use any text editor you want but I would recommend using either VS Code, Atom or Sublime. What these tools offer over regular text editors is that you can install packages or extensions that make it easy to do code formatting and starting up a live development server. I use VS Code and have these extensions installed. I'd recommend that you also install these extensions in order to follow along with this blog post.
The last thing you need to download as part of the setup is the Tableau Extension API JavaScript file. Head over to the official Tableau Extension Github page and hit 'download'.
Step 1: Folder structure
The first step when you create an extension is to make an empty folder. The first file you're going to add here is the .trex file. If you want to read more about what a trex file is then head over to my previous blogpost. You can download the supporting trex file for this post here.
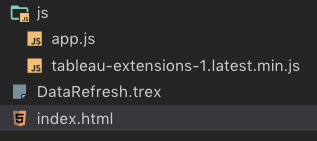
The next step is to create an index.html file, an app.js file and copy the Tableau Extension JavaScript file. It's common to move the two JavaScript files in a separate folder. I have the following file structure:

Step 2: Display Extension in Tableau
Let's now try and make our extension show up in a dashboard. First of all, make sure you've started a server on localhost. The easiest way to do that is, if you use VS Code, to use the Live Server extension that I mentioned earlier. You can right click the index.html file and start the live server. The location and the port is what you'll need to add to your .trex file. In my case it looks as follows in the trex file:

If you're following along then copy this into your index.html file and open up Tableau 2018.2. You then want to drag the Extension dashboard object somewhere in your dashboard, and navigate to the trex file. After you've consented to have this extension on your dashboard you will see 'Hello Tableau' in the extension window.
Excellent. Let's now write some JavaScript so we can start working with the Extension API. Copy this into your app.js file.
At this point you want to read how you can enable remote debugging. This is where Chromium comes in. Head over to the Tableau documentation, and follow these steps. Make sure you open an instance of Tableau through the terminal/command line because that enables you to do remote debugging. After you've established a connection between your dashboard and Chromium you should be able to see the name of your dashboard in the web console.
Edit August 2019: As of Tableau 2019.1 you can do remote debugging with your regular Chrome Browser. No need for Chromium debugging anymore. The process is still the same but you can use a normal Chrome browser now.
Step 3: Do more with your Extension
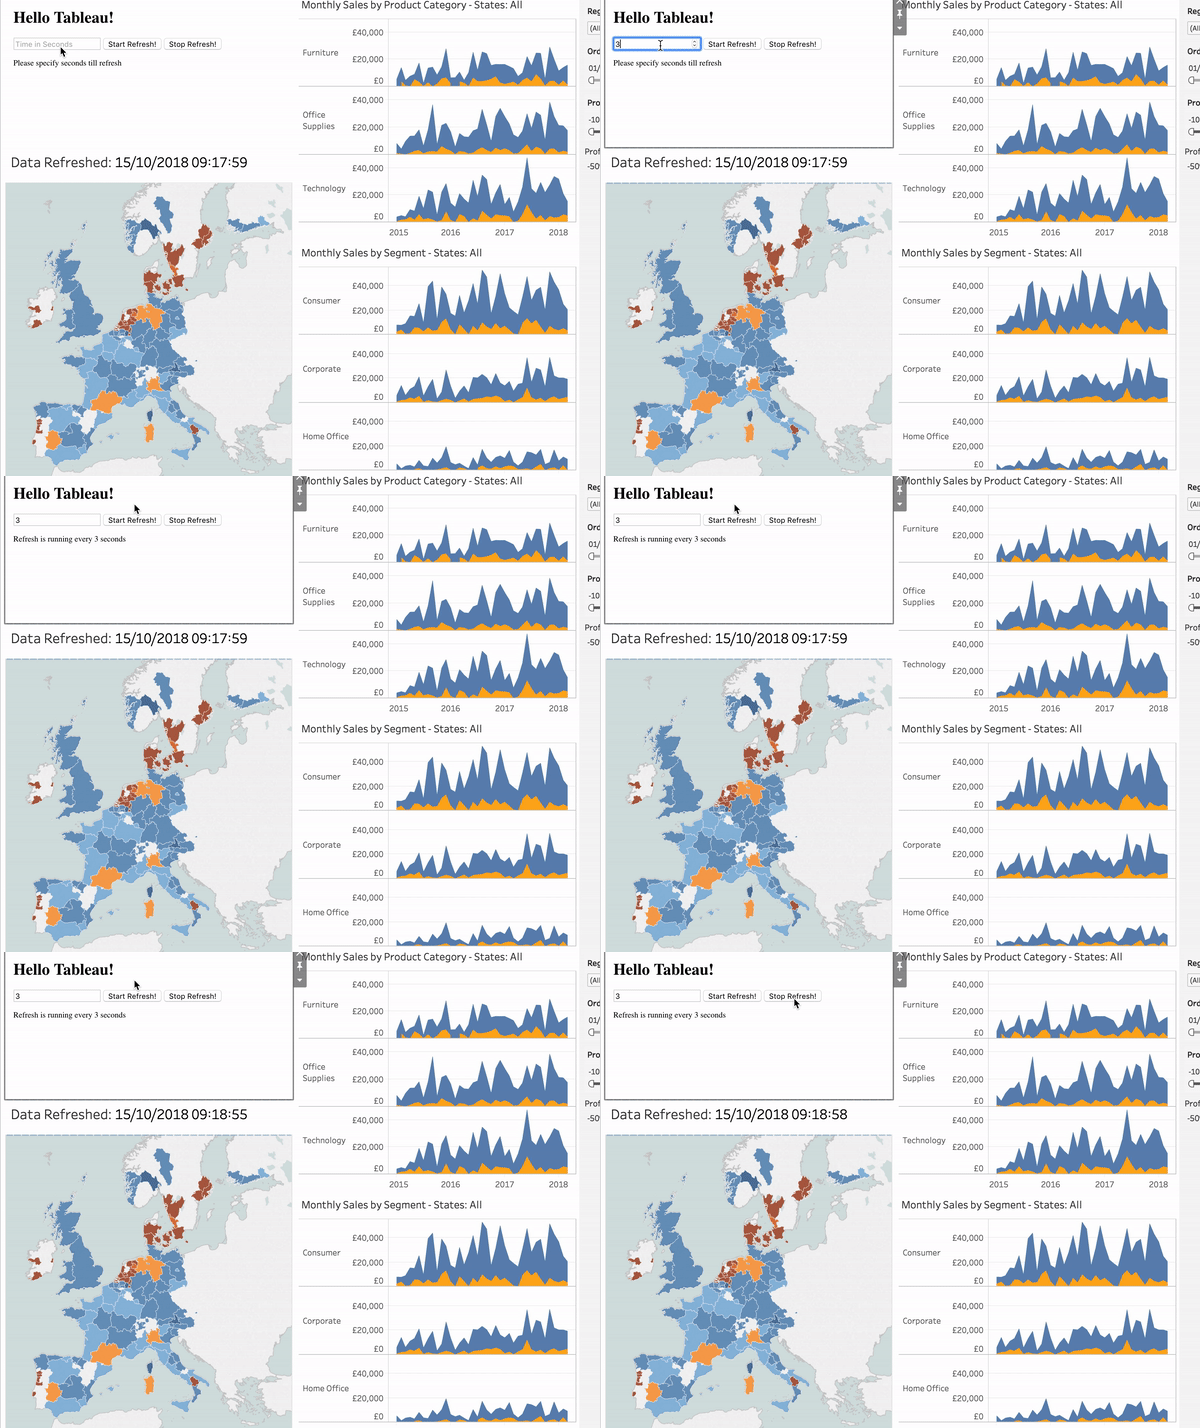
This is a great start! We've managed to initialise our extension and also figured out how to do remote debugging of an extension. Now it's time to re-arrange our HTML file. We want to add an input box where we can add the number of seconds it should take to refresh the data source, a start and stop button. I also added a paragraph with some information of when the auto-refresh is running and when it stopped. The final HTML for this extension should look like this.
What we do with JavaScript is basically grab the input box, the two buttons and the paragraph and change it based on user input. You 'grab' HTML 'DOM' elements with an id or through a class. As you can see in the code I have given them an id so that means I can reference them in my JavaScript file. If you copy this code from script.js into your app.js file you should see that when you click on the start button you first get a notification under the input box that tells you to specify the refresh time. Once you've added the number of seconds in the box and hit 'start' again it starts auto-refreshing your data source every 'n' number of seconds. If you click on the stop button it will break the loop of refreshes. What this means is that I have so-called 'event listeners' on the buttons. Once these are being 'clicked', a function is being executed. This function is either starting the auto-refresh or stopping it. I've also left my console.logs in the code. This means you can see the effect of your clicks in the browser console in Chromium.

Step 4: Make improvements
I've now given you a starting point for building out Extensions. There is still a lot left to do in order to make this a production-ready extension. I've not added any styling to it and therefore it looks like it walked straight out of the 90's. You could use CSS-libraries such as Bootstrap, Foundation or Skeleton to make it look pretty or code up your own CSS. The aim of this blog was not to create something beautiful, but rather to introduce you to building extensions and to have a setup ready so you can start developing your own. The next step would be deployment. This means that others can use your extension because at the moment you're only running your extension locally. I will probably blog about that in the future.