Off the hook! Automating Tableau with Webhooks
Tableau version 2019.4 will see the introduction of webhooks in the Tableau platform. Webhooks allow you to connect Tableau to your apps. This means that an action in Tableau Server or Online can trigger another app. In the simplest setup you could for example send an e-mail whenever a new workbook is published, or more complex setups where you can integrate various Tableau triggers such as extract refreshes in a larger workflow. Webhooks open up a lot of exciting opportunities to automate your Tableau deployment. In this blog post I will outline what webhooks are, why you should use them and how you can use them in your Tableau setup.
DISCLAIMER: Webhooks are currently in beta and will be released in version 2019.4

What are webbooks?
According to the official Tableau's Github repository webhooks let you "build custom applications or workflows that react to events that happen in Tableau. For example, you could use webhooks to send an SMS or Slack notification any time a datasource refresh fails, or fire off a confetti cannon when a new workbook is created. For the initial release, webhooks are supported for a selected set of datasource and workbook events."
Even though webhooks are part of the developer programme of Tableau, you don't need a coding background at all to use them. Nowadays there are several automation platforms such as Zapier, Microsoft Flow or IFTTT that you can fully configure without writing a single line of code. This means that integrating webhooks in your Tableau ecosystem is accessible for all.

What all these automation services basically do is create a 'cause and effect' link between web services that you use. Outside Tableau and especially with the rage that's called 'quantified self', we see lots of integrations where you can trigger events based on your own behaviour. For example, several of my colleagues use these platforms to automate a list of new Twitter followers in Google Sheets, automatically categorise their expenditures or use Alexa commands to push todos in their todoist shopping list. With the introduction of webhooks in version 2019.4 we can now add Tableau to this list of integrations. I can't wait to add Tableau Server to my family WhatsApps group and spam them with extract refresh notifications.
Why should you use webhooks?
You are probably wondering: don't we already have subscriptions in Tableau Server? Yes, that is correct. Subscriptions allow you to 'subscribe' to a view and you can then tell it to email you at a certain time. As a datasource owner you also receive emails when your refreshes have failed. However, these subscriptions are different than webhooks. First of all, webhooks can now be integrated with any other tool - rather than an email when an extract refresh fails, you can now send a message into Slack and the right team can take a look. Secondly, webhooks are event driven, whilst subscriptions are setup on a schedule. You can take action the moment stuff happens on your Tableau Server.
In the initial release you have access to the following events:
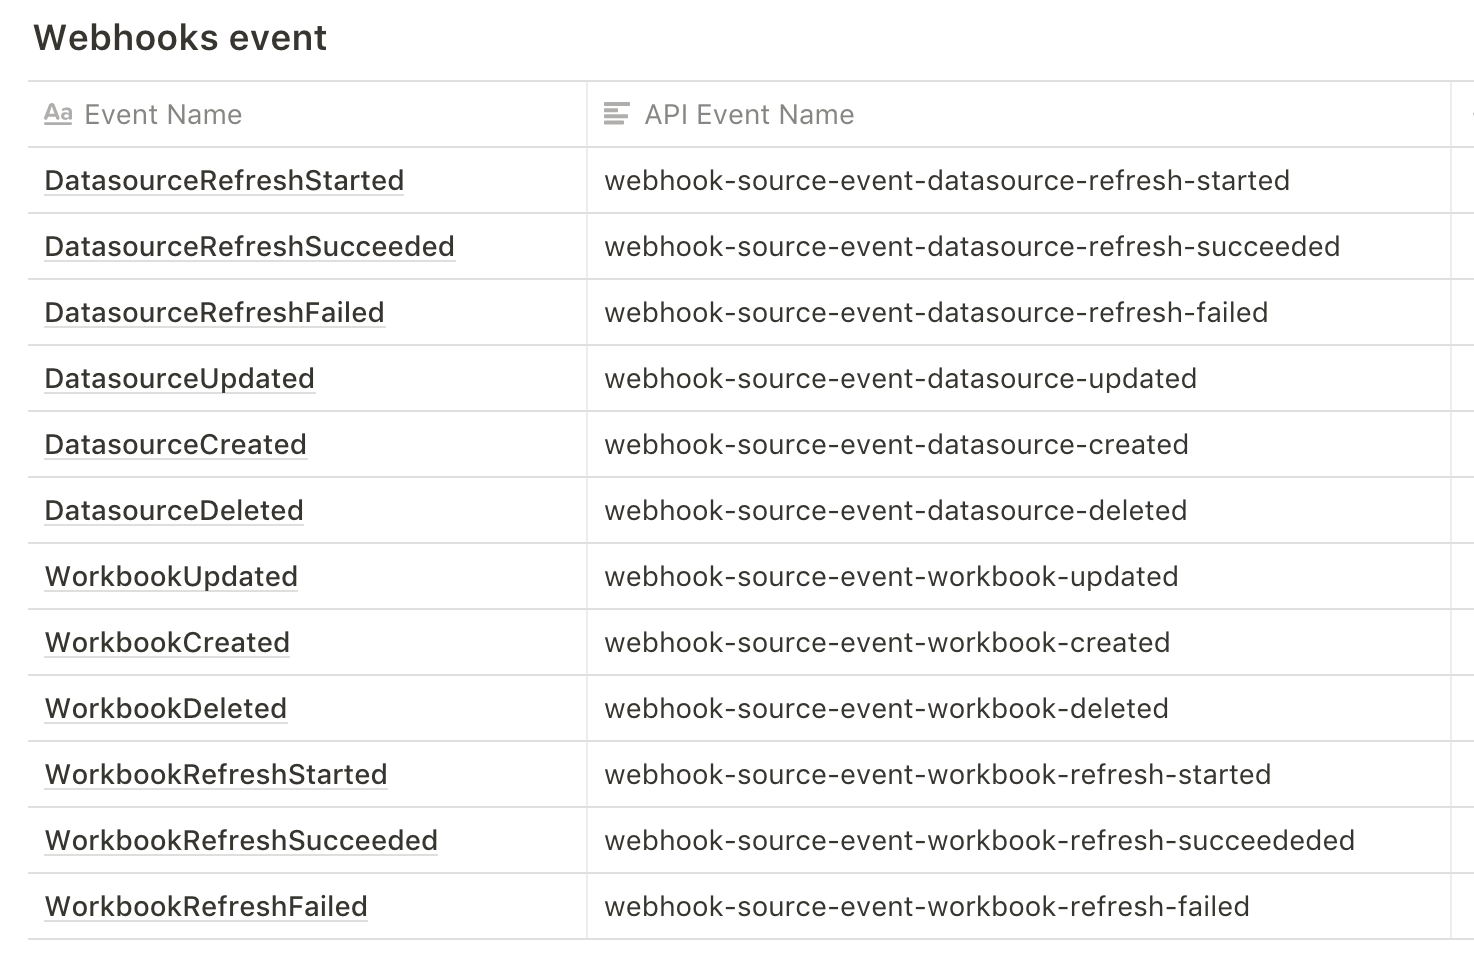
Future releases will have more events and according to the Tableau development team, the plan is to move almost all Tableau Server elements into webhooks such as actions when new users are being added or projects created.
How can you use webhooks?
There is one prerequisite for using Tableau webhooks and that is that you need to be authenticated as a side administrator on your Tableau Server or Online instance. If you want to test out webhooks but you are not on version 2019.4 yet then you can join the Tableau Developer program here. When you join you get a free Tableau Online site which is always kept up to to date to the latest beta. You need a few tools to get started:
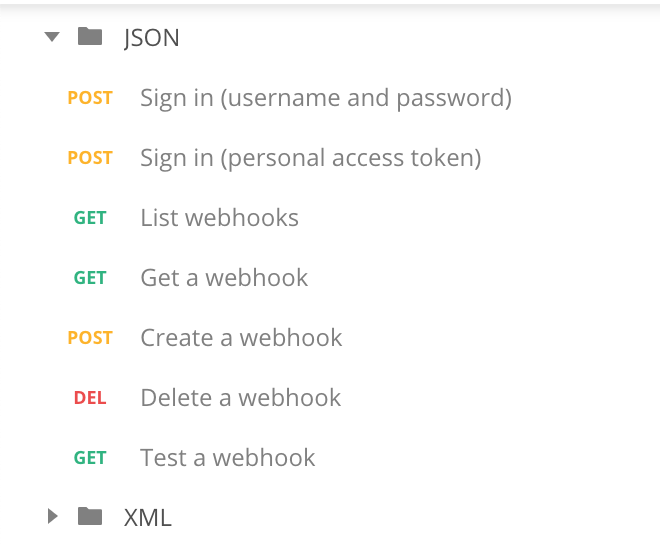
- Download Postman. This tool allows you to easily work with the Tableau REST API and is the place where you create and manage your webhooks.
- We don't want to write code so you need to create an account at either IFTTT, Zapier or Microsoft Flow. There are probably many other automation tools out there. I only have experience with the first two though. IFTTT is very easy to setup but Zapier is more aimed towards integrating business applications. Zapier is also a bit more customisable than IFTTT. But then the downside of Zapier is that you need to pay for it, whilst IFTTT is free of charge.
Once you got these two things setup and you installed Postman (Zapier and IFTTT are just browser based so you don't need to install anything here) you need to grab the Webhooks Postman collection from this Github repository. You need two JSON collections - one is for setting your environment variables, the other one contains the code to login to your server and manage your webhooks. For both you need to click on the link and then save them from within your browser as JSON files.

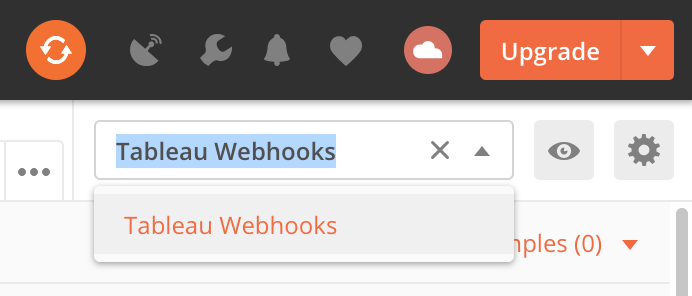
When you got those two files you need to import them into Postman. Go to File - Import - Drop the Postman-Collection-Tableau-Webhooks.json file in the menu. After this repeat the steps for the other JSON file. On the top right you need to switch your environment to 'Tableau Webhooks'.
Click on the little eye icon to add your own Tableau Server or Online details to the environment variables. Another new feature in 2019.4 will be personal access tokens. These tokens are a new way to handle authentication and allow you to use the REST API without having to embed your login details in the request body. You can use these new tokens (read more here) or use the traditional REST API authentication in the Postman collection.
Before you can create a webhook you need to sign in to your Tableau Server/Online and get an auth token (by default this one is valid for 240 minutes). In Postman on the left you see a link to the requests you can send. When you sign In you get this auth token and you need to add this one to the environment variables so it can be used in the other requests.
Now click on 'Create a webhook'. You need to populate the POST body here with some information. On line 4 you specify which event type you want to create - see the table above for a full list of events. On line 9 you need to specify where the payload needs to be send to - this needs to be a URL you create in IFTTT or Zapier. It needs to be https and open to receive POST requests. Line 12 is where you give your webhook a name - this is up to you.
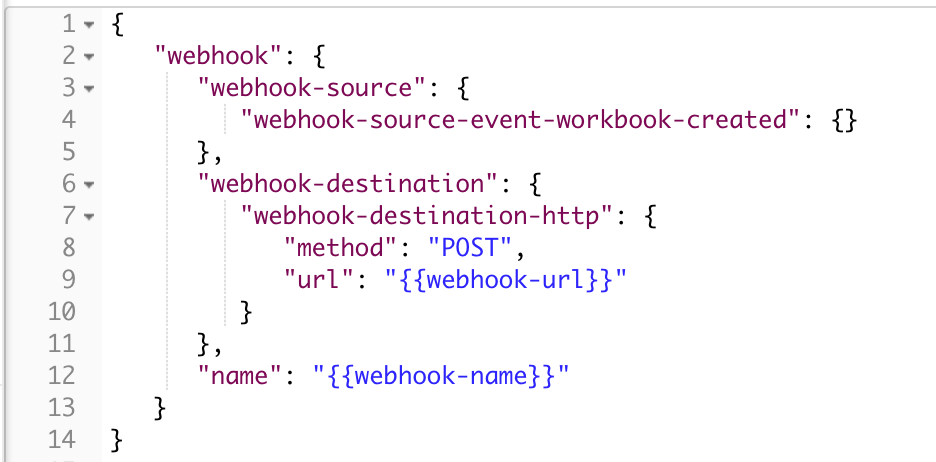
If you take the image above, what will happen is that whenever a new workbook is created on your Tableau Server/Online site a payload will be send to the URL specified on line 9. What this payload contains for each different event is specified in the official docs on Github. For the workbook-created event it is the following:
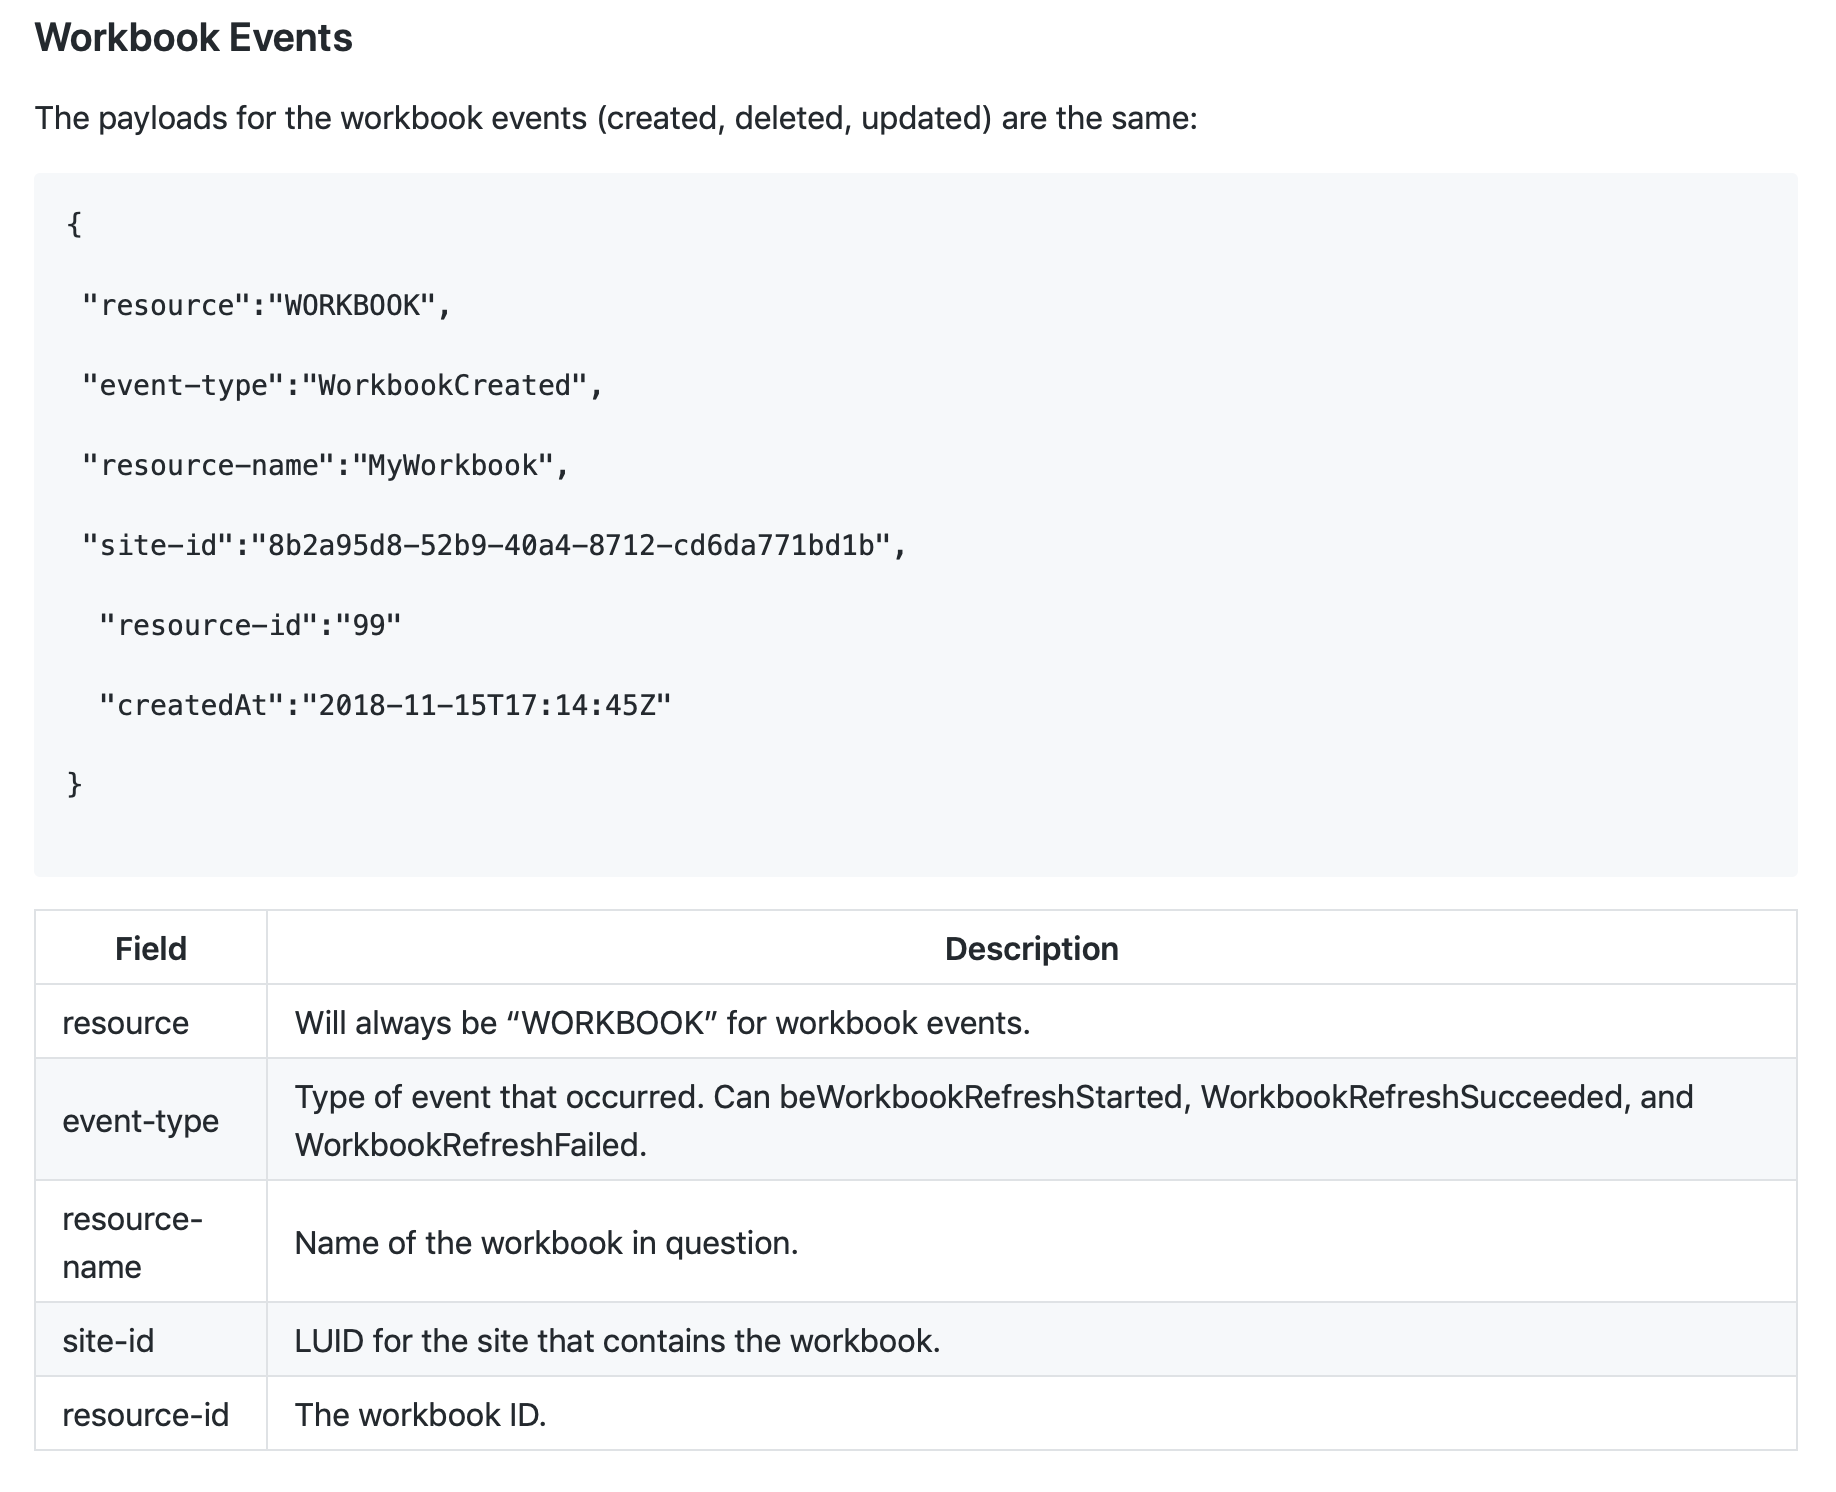
The resource ID is something you could use in combination with the REST API and for example generate a thumbnail of the workbook which you can use in the application that is listening for the webhooks.
Next Steps
It is still very early days for the webhook integration and I'm looking forward to seeing what the Tableau community comes up with in terms of integrations. Internally we are going to setup some webhooks that are automatically sending messages into our communication platform Convo. There are a few other integrations I'm going to look into. You could now for example keep two Tableau Servers in 'sync' by listening for dashboard publications in Server A and then automatically downloading and subsequently uploading those workbook to Server B. Lots of possibilities!